Control System for Multiple Stepper Motors

Threading


Anatomy of a Threaded Box

Cutting threads on the MDF rose engine lathe 2.0 is a special form of helical fluting. It is accomplished in much the same way, and uses a thread cutter (usually 60°) held in a Drill Spindle, primarily using the Synchronization Screen on the Nextion multiple stepper control system.

For threaded boxes, cut the part with female (internal) threads (usually the lid) first.


The many considerations for threading including:

  1. Handedness of the Threads: Do you want the threads to be right or left handed?

  2. How fine a thread (TPI) is best for the item's size and wood selected?

  3. What is the width of the threaded area?

  4. What is the number of starts?

These items are used in the instructions below. Also below are:


Threading Instructions

Screen Actions
Ind
If you are only making single start threads, skip to step 3.
The number of starts on a thread determines how easy it is to start the threading operation and how quickly the piece can be closed.

Commonly used number of starts are 1, 2, or 4.

On the Indexing screen,

  1. Set the Div - Set to divisions of a circle

  2.  Divisions  = Enter the # of starts desired; 2 and 4 are common values.
On the Z Axis Preferences page,
This setting does not address the Handedness of the Threads. Instead, it addresses how the movement of the slide occurs, based on how the leadscrew is threaded.
  1. Ensure the Leadscrew is set for your cross slide's motion.
Left Hand Use when using an apparatus with a left-handed threaded rod. A Hardinge compound slide-rest has a left-handed thread.

Right Hand Use this setting when using an apparatus with a right-handed threaded rod

On the Synchronization screen,
  1. Set  Distance  to the width of the threaded area. This is recommended to be 4 thread widths. The formula is: \[ \begin{align} Distance & = \frac {4}{TPI} \\ \end{align} \]

    For 16 TPI (commonly used), the value is 1/4" (0.25").

  2. Set  Revolutions  using the formula below. \[ \begin{align} Revolutions & = \frac {Distance \times TPI}{Starts} \\ \end{align} \]

    Finer threads work very well for items which are small, and for woods with tight grain patterns. Conversely, woods like ash, oak, and walnut benefit from larger threads (lower TPI).

    Imperial threads are specified at threads per inch (TPI) or thread width. 16 TPI means that there is a thread every 1/16", but using the thread width makes for more cumbersome for the math.

    Thread fineness is not specified directly. Instead, it is determined by the number of revolutions of the spindle which is needed to traverse the specified Distance.

  3. Set the radio button selection for Helix Type to determine the thread handedness.

    Helix Type = Right is recommended.

    Threads are typically right handed, and left handed threads are rarely seen. As they are so commonly used, this is what most users will expect and thusly, right-handed threads are recommended.


  4. Before starting the cutter's movement ...

    Be sure the cutter is positioned on the slide so that there is adequate room to move the cutter during the entire distance.

  5. Start the cutter.

  6. Touch to start the cutting.

    • Outward movement is generally recommended for threading operations on metal lathes (even though the typical jigs for wood lathes cuts in the opposite direction). The advantage of starting at the shoulder and moving outward from there is that it is less critical where the movement in the Z axis stops. Once the cutter has stopped cutting wood, continuing to move in that direction causes no harm to the piece.

    • Conversely, if the cut were to be in the other direction, then a wrongly selected value for Distance would cause the cuts to be wrong, and could cause a whole host of other problems as well.

  7. If additional passes are needed to get the threads to the desired depth, then
    1. Note where the cutter's depth is set to on the cross slide.
    2. Back the cutter out
    3. Return the cutter to the starting position.
    4. Set the cutter'd depth to where it needs to be, and repeat steps 7-9.
  1. If you are only making single start threads, you are completed.

    Otherwise, to index to the next start, use the or the button.

  2. Repeat steps 8 thru 10 for each start.

Other Considerations and Additional Notes

  1. 60° cutters are most commonly used. One ornamental turner has a 90° cutter, and he reports that it gives slightly stronger threads. Other thread forms such as square and buttress can also be created.

  2. Measurements based on a machinist's approach to threading are available via the Thread Calculator to the right.

  3. When cutting threads, backlash should be factored into your actions. When making multiple passes, the sliderest should be moved to the start position from the same direction. If you are cutting threads towards the headstock, then the sliderest should be moved away from the headstock to the start position. Ideally the start position should be just outside the workpiece far enough to account for the backlash.

  4. 1-start, 2-start, 3-start, & 4-start leads
  5. If you are looking for generic information about starts (AKA, leads), there is a good web site for learning about them at Do you have a Need for Speed? Use Multiple-Lead Threads. They have information that explains the chart to the right.

  6. There is no thread dial on this lathe to ensure multiple passes are cut in the same place. Thusly, after each pass, it is important to return the cutter to the starting position relative to the spindle.


Cutter with Long Nose
Image courtesy ChefwareKits

Cutter with Short Nose
Image courtesy Hope Woodturning

The length of the cutter's nose also needs to be considered.


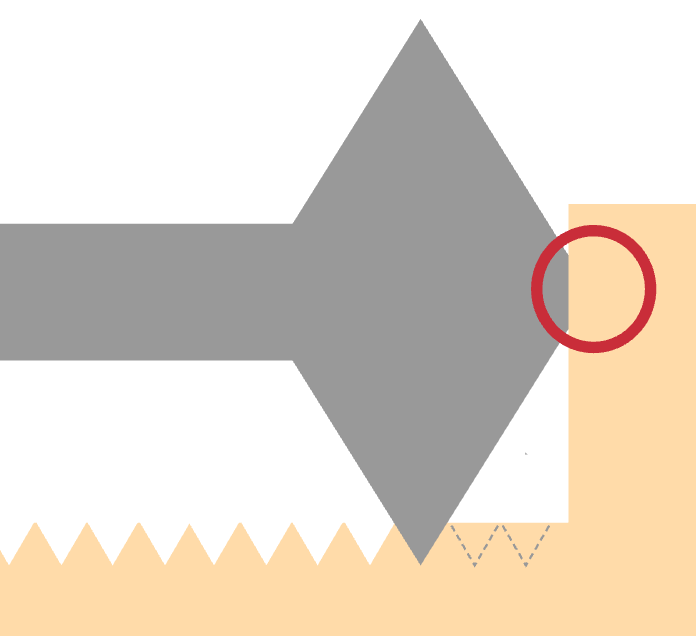
Cutter Interference with Shoulder

Thread Width and Depth

The typical thread cutter has a 60° bevel like the one shown to the right. That is a good one, and can certainly be used. But one thing identified by a number of users is that the nose projects out quite a bit, and that extra projection can interfere with the cutting if you want to get the threads close to the shoulder (see also, the area circled in red in the top diagram to the left).

The shape of the traditional cutter allows for deep threads to be cut; however most work in ornamental turning does not need that depth. As outlined in the second diagram to the left, when fine threads are used, the thread's depth and width are small (the area in blue at the bottom of the cutter). And there is quite a bit of area on the cutter that is unused (the part in red).

Some ornamental turners grind the red section off to allow for cutting closer to the shoulder. If you take that route, be sure to manage your heat so that you do not damage the cutter.

There is a cutter from Hope Woodturning (shown to the right) where they have 3mm of length ground off to allow for cutting in closer to the shoulder of the threaded area. (Other companies may also offer one.)

When buying a cutter, be sure to consider what size your Drill Spindle will hold. If you are using an ER-16 collet, look for one with a 3/8" shaft. 1/2" is probably too big. Companies known to supply cutters which will fit an ER-16 collet include:


Resources About Threading